Local AI/ML Hosting
Local AI/ML hosting involves running AI/ML models—both training and inference—directly on your own hardware, such as desktop GPUs, home servers, or edge devices like Raspberry Pi. This approach offers several key advantages:
- Eliminates dependency on cloud services
- Enhances data privacy
- Reduces latency
- Cost efficient for sustained or high-frequency workloads
By leveraging frameworks like TensorFlow, PyTorch, ONNX Runtime, or NVIDIA TensorRT, users can deploy AI applications locally for use cases ranging from computer vision and natural language processing to edge analytics and automation. Local AI/ML hosting is an ideal solution for privacy-conscious developers, home lab enthusiasts, and AI practitioners seeking greater control over their environments.
GPUs in My Home Lab
I utilize three different GPUs across various systems, each serving distinct roles:
| Feature | Raspberry Pi 5 (VideoCore VII) | AMD Radeon 780M | NVIDIA GeForce RTX 3080 |
|---|---|---|---|
| GPU Type | Integrated (SoC-based GPU) | Integrated (iGPU, part of AMD APU) | Discrete (dGPU, standalone) |
| Architecture | VideoCore VII | RDNA3 | Ampere |
| VRAM | Shared system RAM | Shared system RAM | 10GB (GDDR6X) |
| Compute Units | ~1-2 SIMD engines (~128–256 ALUs) | 12 CUs (~768 shaders) | 8704 CUDA cores |
| Tensor Core Count | 0 | 0 | 272 |
| Base / Boost Clock | ~500–700 MHz (shared with SoC) | ~2700 MHz (APU-dependent) | 1440 MHz / ~1905 MHz |
| Ray Tracing Support | No | Basic / Emulated (low-end) | Yes, full hardware-accelerated |
| TDP | ~5W (entire board incl. GPU) | ~50W (part of APU) | 370W (requires external PSU) |
| Performance Class | Basic GUI, media playback, light 3D | Entry-level gaming, media, and desktop | High-end gaming, 4K rendering, AI training |
| Release Year | 2023 | 2023 | 2020 |
Raspberry Pi 5 (VideoCore VII)
The Raspberry Pi 5 features an integrated VideoCore VII GPU, which is built directly into the SoC. While modest in performance, it is well-suited for lightweight graphical tasks, basic desktop environments, and hardware-accelerated media playback. It's a power-efficient solution for small-scale applications, monitoring dashboards, or kiosk-style displays.
VideoCore VII is not suitable for AI/ML workloads, as it lacks support for general-purpose GPU (GPGPU) compute APIs like CUDA or OpenCL, and does not provide the necessary floating-point throughput for deep learning inference or training.
To enable AI/ML capabilities on the Raspberry Pi 5, you can integrate an external hardware AI/ML accelerator such as Google Coral or Hailo AI accelerator. It transforms the Pi into an edge inference device suitable for real-time computer vision, audio classification, or other lightweight deep learning tasks. Refer to the "Home Lab Projects" section for related projects.
AMD Radeon 780M
The UM890 Pro mini-PC is equipped with an integrated AMD Radeon 780M GPU. As part of AMD's high-performance mobile APU lineup, this GPU delivers solid graphics performance for general-purpose computing, 1080p gaming, and hardware-accelerated media and virtualization tasks. It strikes a strong balance between efficiency and capability, making it ideal for compact systems and home lab environments. While it can technically run lightweight machine learning models or perform basic parallel computations, it lacks specialized hardware like tensor cores and optimized deep learning libraries. Therefore, it is not ideal for AI/ML workloads.
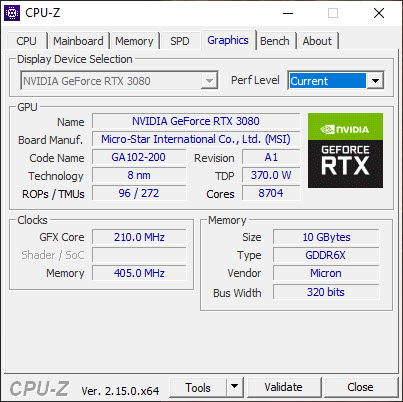
NVIDIA GeForce RTX 3080
My workstation desktop PC includes a NVIDIA GeForce RTX 3080, a discrete GPU connected via PCI Express x16 Gen3. This GPU is well-suited for high-end gaming, 4K rendering, GPU-accelerated simulations and AI/ML applications. It has 272 third-generation Tensor cores optimized for deep learning, support for mixed-precision operations (FP16, TF32), and compatibility with CUDA, cuDNN, and TensorRT. It is excellent for both training and inference of modern neural networks, making it the backbone of my compute-heavy tasks.
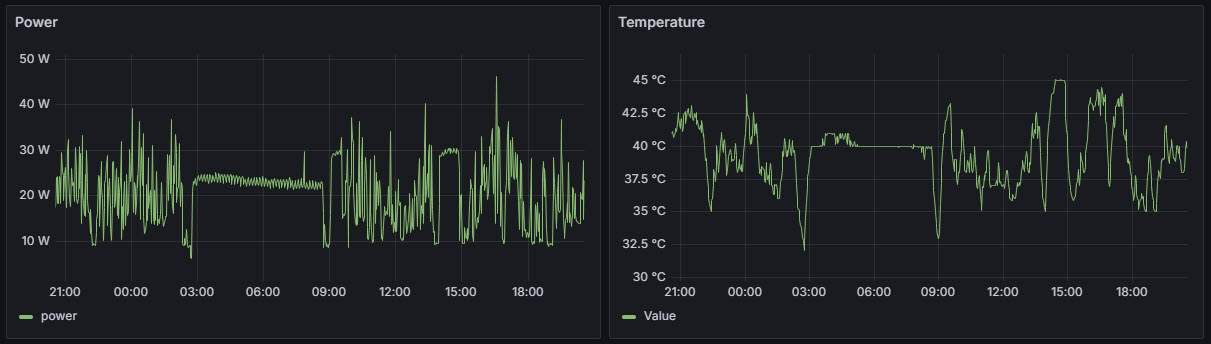
The typical idle power consumption of the RTX 3080 ranges between 20 to 30 watts, with many models supporting a zero-RPM fan mode, in which the fans remain off when the GPU is idle. In multi-monitor configurations, idle power may increase slightly due to elevated memory clock states. Correspondingly, idle temperatures generally fall within the 40–45°C range, though actual values may vary based on case airflow, ambient temperature, and cooling behavior. These figures are consistent with the telemetry data I am actively collecting from my RTX 3080 card.
Under full load, RTX 3080 can draw up to 370 watts of power, especially during sustained gaming or compute-intensive workloads. To ensure system stability and adequate headroom, NVIDIA recommends a minimum 750W power supply for systems using an RTX 3080. However, for users with high-performance CPUs, multiple drives, or overclocked components, a quality 850W PSU is advisable. It's important to use a high-efficiency (80 Plus Gold or better) power supply. In my system, I use the be quiet! Straight Power 11 850W power supply, which is 80 Plus Gold certified for high energy efficiency and stable power delivery.
Dual-Environment GPU Workflow
NVIDIA RTX 3080 is installed in my primary workstation, which I use for both Windows and Linux environments, depending on the task. All of my development work—particularly AI/ML and system-level programming—is performed within a Linux environment, while I rely on Windows for tasks such as productivity tools, media editing, gaming, etc. To support both operating systems on a single machine while ensuring that Linux has access to the GPU for accelerated development, there are several viable solutions:
Dual Boot (Linux and Windows)
Dual booting involves installing Linux alongside Windows on the same machine and choosing which operating system to boot into at startup. This method provides full native access to the NVIDIA GPU while Linux is running, ensuring maximum performance for AI/ML training and inference. However, the key limitation is that you can't use both operating systems simultaneously, making it less convenient for workflows that require switching back and forth between Linux and Windows environments.
Linux as the Host with Windows in a VM
Installing Linux as the primary operating system and running Windows in a virtual machine—is a popular solution among developers and power users. Using virtualization tools like KVM/QEMU, you can pass through your NVIDIA GPU to the Windows VM, while Linux retains control over the system and potentially another GPU for display. This configuration provides full Linux development flexibility, native CUDA support, and the ability to run Windows for specific applications like gaming or Adobe tools.
Windows as the Host with Linux in a VM
Running Linux in a virtual machine on Windows requires
GPU passthroughto achieve direct access to the GPU, which involves advanced configuration. Technologies such as Hyper-V's Discrete Device Assignment (DDA) can enable this by assigning a physical GPU directly to the Linux VM. However, DDA is only supported on specific NVIDIA GPU models and Windows editions, and even then, setup can be complex. In this configuration, the GPU is isolated for exclusive use by the VM, meaning the Windows host cannot access it while the VM is running. While this approach offers near-native performance for Linux-based GPU workloads, it is often impractical unless the hardware platform and software stack fully support passthrough.WSL2 with GPU Support
WSL2 (Windows Subsystem for Linux) allows you to run a genuine Linux kernel within Windows, offering a convenient way to develop in a Linux environment without leaving your main OS. With the latest Windows builds, WSL2 now supports GPU acceleration, enabling AI/ML workloads using CUDA-compatible NVIDIA drivers. This option is easy to set up and ideal for developers who prefer staying in Windows but still need access to Linux tools and GPU-powered workflows. While you don't get full GUI performance, it's well-suited for CLI-based AI development and model inference.
Dual-OS Virtualization with Type-1 Hypervisor
Another viable solution is to install a Type-1 hypervisor such as Proxmox VE directly on the workstation. This setup allows you to run both Linux and Windows as virtual machines side by side, each with its own dedicated resources.
To enable GPU-accelerated workloads—such as AI/ML development or gaming—you would need to configure
GPU passthroughusing technologies like VFIO (for Linux VMs) or PCIe passthrough (for Windows VMs). This allows the GPU to be assigned exclusively to one VM, typically Windows or Linux depending on your priority. While setup requires IOMMU support and BIOS configuration, this approach provides excellent flexibility and performance, especially for users who want both operating systems to run concurrently with near-native access to the GPU.
WSL2 Setup
I've been using Windows on my Desktop PC for years—with installed applications, configurations, and workflows—I didn't want to replace or disrupt the existing setup. Reinstalling everything on a new OS or transitioning to a dual-boot configuration would be time-consuming and potentially error-prone. As a result, I chose to go with WSL2 setup explained above. With support for GPU acceleration via CUDA, WSL2 provides a convenient and efficient way to develop and test AI/ML workloads in Linux without leaving the Windows ecosystem.
Here are my current WSL distributions:
> wsl --list --verbose

NAME              STATE           VERSION
* Ubuntu          Stopped         2
docker-desktop    Stopped         2
To launch Ubuntu, I simply run:
> wsl -d UbuntuTo check if your WSL2 Ubuntu installation can detect and use your NVIDIA GPU run:
$ nvidia-smiWe can use the CuPy Python library to stress test the GPU by performing repeated matrix multiplications for 10 minutes. The script sets up two large 4096×4096 matrices on the GPU and enters a timed loop where it continuously computes their dot product, which exercises the GPU's compute cores. After each iteration, the CuPy memory pool is cleared to avoid memory buildup during the stress test.
import cupy as cp
import time

# Check CUDA runtime version
cuda_version = cp.cuda.runtime.runtimeGetVersion()
major = cuda_version // 1000
minor = (cuda_version % 1000) // 10
print(f"CUDA Version: {major}.{minor}")

###########################

# Get GPU device object
device = cp.cuda.Device(0)

# Get device property
dev_proprties = cp.cuda.runtime.getDeviceProperties(device.id)

# Print device name
gpu_name = dev_proprties['name']
print(f"Using GPU device: {gpu_name}")

###########################

print("Starting GPU stress test...")

# Set matrix size large enough to stress the GPU
matrix_size = 4096
duration_seconds = 600  # 10 minutes
counter = 0

# Create initial matrices on GPU
a = cp.random.rand(matrix_size, matrix_size)
b = cp.random.rand(matrix_size, matrix_size)

start_time = time.time()
elapsed = 0

while elapsed < duration_seconds:
    cp.dot(a, b)
    cp._default_memory_pool.free_all_blocks()  # prevent memory accumulation
    counter += 1
    elapsed = time.time() - start_time

print(f"Completed {counter} matrix multiplications in {duration_seconds} seconds.")
print("GPU stress test complete.")
Here is a sample output:
CUDA Version: 12.4
Using GPU device: b'NVIDIA GeForce RTX 3080'
Starting GPU stress test...
Completed 1418 matrix multiplications in 600 seconds.
GPU stress test complete.
During the stress test, the GPU power consumption jumped to around 180 watts and the temperature rose to 92 °C. This indicates that the GPU is actively engaged and operating under a significant computational load. This is a useful test for verifying CUDA support, thermal behavior, and system stability under sustained GPU load.
