Self-hosted Site
The Hermes Raspberry Pi node is configured as a self-hosted web server running a WordPress-based site. The name Hermes, inspired by the Greek god of communication, messages, and commerce, aligns well with the role of this node as a web service host. The setup includes WordPress and MariaDB running inside containers, with persistent storage configured to ensure data durability and consistency across restarts.
services:
  wordpress:
    image: wordpress:latest
    container_name: wordpress
    ports:
      - "8080:80"
    environment:
      WORDPRESS_DB_HOST: db
      WORDPRESS_DB_USER: ${WP_DB_USER}
      WORDPRESS_DB_PASSWORD: ${WP_DB_PASSWORD}
      WORDPRESS_DB_NAME: ${WP_DB_NAME}
    volumes:
      - wordpress_data:/var/www/html
      - ./custom-php.ini:/usr/local/etc/php/conf.d/custom-php.ini
    depends_on:
      - db
    restart: on-failure:3

  db:
    image: mariadb:latest
    container_name: wordpress-db
    environment:
      MYSQL_ROOT_PASSWORD: ${DB_ROOT_PASSWORD}
      MYSQL_DATABASE: ${WP_DB_NAME}
      MYSQL_USER: ${WP_DB_USER}
      MYSQL_PASSWORD: ${WP_DB_PASSWORD}
    volumes:
      - db_data:/var/lib/mysql
    restart: on-failure:3

volumes:
  wordpress_data:
  db_data:
The WordPress web page can be accessed directly:
http://192.168.2.177:8080To enable remote access to the self-hosted site, several key considerations must be addresses:
- Production-Grade Web Serving
- Firewall Configuration
- Domain Name Configuration
- Dynamic DNS Setup
- SSL Certificate
- Nginx Metric Collection
- Website Monitoring
- Website User Tracking
Production-Grade Web Serving
The internal web server bundled with WordPress is primarily intended for development and debugging purposes. For a production-ready deployment, an Nginx server is configured on the host as a reverse proxy. It handles incoming requests and forwards them to the WordPress application server running on 127.0.0.1:8080.
server {
    listen 80 default_server;
    listen [::]:80 default_server;

    server_name _;

    location / {
        proxy_pass http://127.0.0.1:8080;
        proxy_set_header Host $host;
        proxy_set_header X-Real-IP $remote_addr;
        proxy_set_header X-Forwarded-For $proxy_add_x_forwarded_for;
        proxy_set_header X-Forwarded-Host $host;
        proxy_set_header X-Forwarded-Proto $scheme;
    }
}
The proxy_set_header directive in Nginx is used to modify or set specific HTTP headers that are sent to the backend server when a request is proxied.
| proxy_set_header | Description | Why You Need It |
|---|---|---|
Host $host; | Sets the Host header to the original domain used by the client. | Preserves the original host so your backend can respond appropriately (e.g., for virtual hosts or URL generation). |
X-Real-IP $remote_addr; | Sends the client's real IP address to the backend. | Allows your app to log and process the true client IP instead of Nginx's 127.0.0.1. |
X-Forwarded-For $proxy_add_x_forwarded_for; | Adds the client’s IP to the X-Forwarded-For header, appending to any existing list. | Useful for tracking client IPs through multiple proxies (load balancers, gateways, etc.). |
X-Forwarded-Host $host; | Sends the original Host header value as a separate header. | Optional, but can help if backend apps or plugins use X-Forwarded-Host for URL building or redirects. |
X-Forwarded-Proto $scheme; | Sends the original protocol (http or https) used by the client. | Helps your backend know if the request was secure or not, useful for redirects, secure cookies, etc. |
The web page can be accessed through nginx with:
http://hermes.home:80Note that the hostname hermes.home is only resolvable within the local network, as it relies on a local DNS server for name resolution. As such it is only accessible from devices connected to the home network.
Firewall Configuration
We need to ensure that the HTTP (port 80) and HTTPS (port 443) ports are open and forwarded in the router/firewall configuration to allow external access to the web server.
Domain Name Configuration
To enable access to the hosted web application using a user-friendly domain name instead of a raw IP address, I have registered the domain homelabtech.dev through Namecheap domain registrar. A A + DDNS record has been configured for the subdomain blog.homelabtech.dev, which maps to the public IP address of my home network. A DNS lookup on the subdomain shows the correct IP address:
$ nslookup blog.homelabtech.dev

Non-authoritative answer:
Name:   blog.homelabtech.dev
Address: 76.x.x.x
Dynamic DNS Setup
To accommodate potential changes in the public IP (as is common with residential ISPs), a Dynamic DNS solution is also being implemented to keep the DNS records up to date automatically.
A dynamic DNS client is running on Hermes to update my domain registrar. There exists many DDNS client such as ddclient and inadyn. I am using the later since it support running in a Docker container. The inadyn configuration file looks like the following:
period = 300

custom namecheap {
    username = homelabtech.dev
    password = /my/password
    hostname = blog
    ddns-server = dynamicdns.park-your-domain.com
    ddns-path = "/update?domain=%u&password=%p&host=%h&ip=%i"
    ddns-response = "<ErrCount>0</ErrCount>"
}
To run the inadyn container:
$ docker run -d --name inadyn --restart unless-stopped -v $PWD/inadyn.conf:/etc/inadyn.conf:ro ghcr.io/troglobit/inadynSSL Certificate
Secure access to the website is a priority. While Namecheap offers paid SSL certificates, a free SSL certificate from Let's Encrypt is being used instead. Let's Encrypt certificates support Domain Validation (DV), which is ideal for personal and small business websites.
Certbot is a free, open-source tool that automates the process of obtaining and renewing SSL/TLS certificates from Let's Encrypt. You can start the Certbot client by following invocation. Note that we need to forward port 80 (HTTP) and 443 (HTTPS) for Let's Encrypt to issue a certificate via HTTP-01 challenge.
$ sudo certbot --nginx -d blog.homelabtech.devThe -d option specifies the domain name for which to request an SSL certificate from Let's Encrypt. Moreover, the --nginx option tells Certbot to use the Nginx plugin, which can automatically configure SSL for Nginx by editing its config files.
Let's Encrypt certificates need to be renewed every 90 days. Certbot typically sets up a systemd timer or a cron job that checks for expiring certificates twice a day and renews them if they are within 30 days of expiration.
$ systemctl list-timers | grep certbotNow let us send a request to our domain name:
$ curl -Ik https://blog.homelabtech.dev

HTTP/1.1 301 Moved Permanently
Server: nginx/1.24.0 (Ubuntu)
Date: Fri, 04 Apr 2025 22:29:41 GMT
Content-Type: text/html; charset=UTF-8
Connection: keep-alive
X-Powered-By: PHP/8.2.28
X-Redirect-By: WordPress
Location: https://blog.homelabtech.dev:8080/
WordPress is redirecting us to port 8080. WordPress thinks it's running on http://blog.homelabtech.dev:8080 because that's the internal URL it's configured with, so it generates links and redirects using that port. We need to tell WordPress it's running behind a reverse proxy, and that the proper scheme is HTTPS. To fix this, I added these two lines into wp-config.php:
define('WP_HOME','https://blog.homelabtech.dev');
define('WP_SITEURL','https://blog.homelabtech.dev');
Sending the request again and everything looks good:
$ curl -Ik https://blog.homelabtech.dev

HTTP/1.1 200 OK
Server: nginx/1.24.0 (Ubuntu)
Date: Fri, 04 Apr 2025 22:43:54 GMT
Content-Type: text/html; charset=UTF-8
Connection: keep-alive
X-Powered-By: PHP/8.2.28
Link: <https://blog.homelabtech.dev/wp-json/>; rel="https://api.w.org/"
Nginx Metric Collection
The Nginx Stub Status module is a lightweight built-in feature that provides basic real-time metrics about Nginx's performance and health. When enabled, it exposes a simple plain-text status page showing key stats such as:
- active connections
- accepted and handled requests
- number of connections currently reading, writing, or waiting
This is especially useful for monitoring tools like Telegraf, which can scrape this endpoint to collect and report Nginx metrics without adding significant overhead. We are going to configure the following server block:
server {
    listen 127.0.0.1:80;
    location /nginx_status {
        stub_status;
        allow 127.0.0.1;
        deny all;
    }
}
To get nginx metrics:
$ curl http://127.0.0.1/nginx_status

Active connections: 2
server accepts handled requests
4 4 3
Reading: 0 Writing: 1 Waiting: 1
We then configure inputs.nginx plugin in telegraf to report these metrics to influxDB.

Here is an explanation for each field:
| Field | Description |
|---|---|
| accepts | Number of accepted client connections. |
| handled | Number of connections handled successfully. Usually equal to accepts unless there's a problem. |
| requests | Total number of client requests processed. |
| active | Current active connections (including reading, writing, waiting). |
| reading | Number of connections where Nginx is reading the request header. |
| writing | Number of connections where Nginx is sending a response back. |
| waiting | Keep-alive connections waiting for the next request. |
Website Health Monitoring
We can use Telegraf to collect uptime and accessibility metrics of the home lab website. However, that will test our site's availability from inside the network — not the same as testing from the public internet.
To monitor external accessibility, we can use uptime monitoring services such as UptimeRobot, BetterStack (formerly Better Uptime), StatusCake, etc. They all offer free tiers for website monitoring, but they differ in scope, frequency, and features.
UptimeRobot is the most generous, allowing up to 50 monitors with checks every 5 minutes (1 minute on paid plans), making it ideal for personal or home lab use. However, in my experience, the UptimeRobot REST API lacks flexibility and polish, making integration less straightforward.
In contrast, BetterStack offers a more modern and well-structured API, with a thoughtfully designed developer experience. BetterStack offers integration support with a variety of tools, including Grafana; however, access to these integrations typically requires a paid subscription.
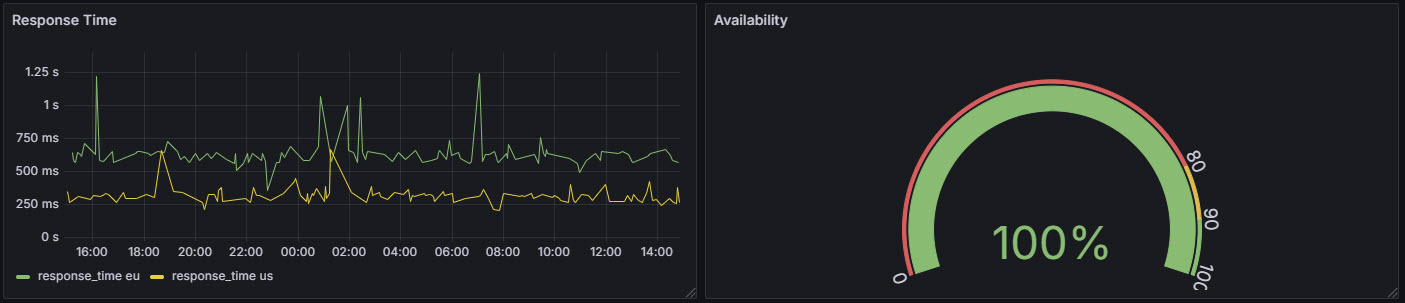
To work around this limitation, I developed a lightweight Python script that leverages BetterStack's REST API to retrieve monitoring data. The script also includes a built-in REST server, enabling Grafana to query and visualize the data using plugins such as the Infinity data source. You can find the script in here.
I am visualizing website response times from both the United States and Europe, along with the overall availability percentage of the site.
Website Visitor Monitoring
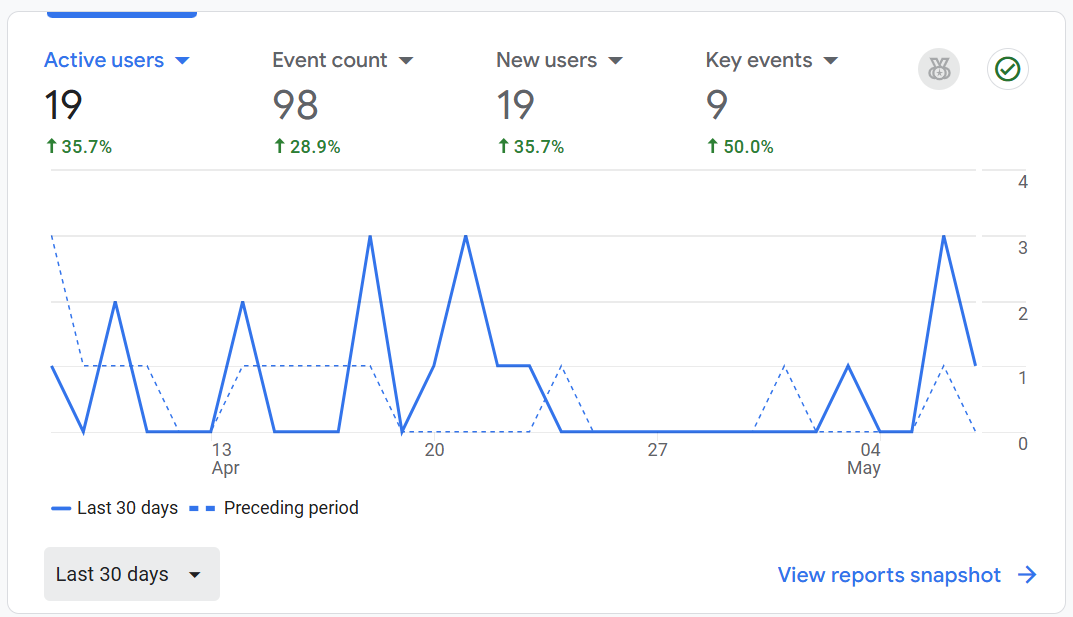
Google Analytics is a web analytics service offered by Google that allows website owners to track and analyze visitor behavior. It provides insights into how users find and interact with a site, including metrics such as page views, session duration, bounce rates, traffic sources, and user demographics. By collecting and visualizing this data, Google Analytics helps site owners optimize content, improve user experience, and make informed decisions to grow their online presence.
If you are running Pi-hole, be aware that it may block Google Analytics entirely. This can prevent you from accessing analytics dashboards or even logging in to the platform. If you encounter this issue, a practical workaround is to use the Pi-hole browser extension, which allows you to temporarily disable Pi-hole or manage domain-level allow/deny lists directly from your browser. While not a perfect solution, it’s a convenient tool for quickly managing access when working with services like Google Analytics.